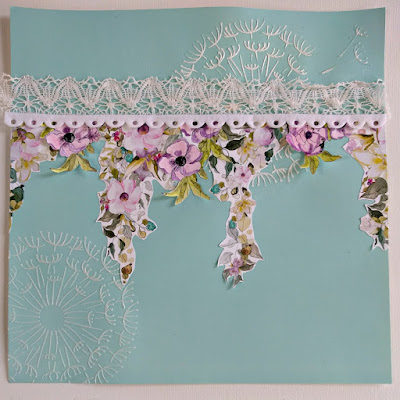
Saturday, January 25, 2020

Embossed and Die Cut Valentine Card

An embossed and die cut Valentine Card in classic colors is sure to be a hit. It can be tricky to work with foiled paper and not leave dents or other marks. Check out the tips below if you have struggles.
~ love you ~
The best card starts with a nicely layered base of interesting papers. Here I chose a pearlescent patterned cardstock, star embossed foiled paper, and black card stock. The embossed piece is rather intricate and it took some time to remove all the bits.
 The wings are die-cut from gold foiled paper and embossed with the feather design. placing the wings directly on the cared would have caused them to lose shape. I also cut and embossed additional wings from cardstock to give the foiled paper a cushion. I ran Tape Runner directly on the cardstock then added the foiled paper. This preserved the embossed design.
The heart is popped up off the card front. I added strips of foam and again applied the adhesive to the foam rather than the foiled paper.
 This is my first project for the Tape Runner Design Team and I am really liking the product. Purchase Tape Runner with Amazon Prime or on Etsy.
Supplies:
Cardstock:Recollections
Patterned Paper:Colorbok
Foiled Paper:Rinea
Cutting Dies:Crafter's Companion, Peachy Cheap, Darice
Adhesive:Tape Runner

Scrap On!

~charity~


Saturday, January 18, 2020

How To Make Butterfly Trails with Sequins

The butterflies on this printed paper just scream to be given trails with sequins. I've used ink pen, stitching, gems, and enamel dots; but this is a first with sequins. I had to start by outlining the butterflies as they merge into the pattern.
~ Hello Sunshine ~
I drew the trail with Helmar glue then shook the sequins over it. I dusted off the extra sequins and repositioned the remaining ones into the right shape. It's a process that I will have to refine, but the result is lovely.
Here they are reflecting the light. The shine is phenomenal!
Rows of punched butterflies and a glittered burlap shape continue the theme. This is a companion page to last weeks post Prickle Pig. I used the same lavender, spotted tape with a different stitching technique. 
I stacked and stitched the pink and yellow butterfly sequins from Spiegel Mom Scraps sequin mixes. I bent the wings up and left the gold braid long for antenna.
Supplies:
Cardstock:Craftsmith
Burlap Butterflies, Paper:Bo Bunny
Veneer:Peachy Cheap
Adhesive:Helmar
Tickets and Flowers:Prima
Sequins, Cork:Spiegel Mom Scraps
Circle Cutter and Butterfly Punch:Kreaxions

Scrap On!

~charity~


Saturday, January 11, 2020

Quick and Easy Stitched Sequin Layout

This porcupine layout features wood grain paper and a row of stitched sequin hearts. This sweet little lady had quite a thing for carrots. She was thrilled to waddle up to Si and eat out of his hand, then search for more.
~ Prickle Pig ~
I echoed the heart shape in veneer, felt, cork, and cut outs along the photo edges. The bird is a feature of the patterned paper. I added gems to the branch and butterflies. Prima flowers with the 5th petal trimmed into antenna made delicate butterfly embellishments.
I added a strip of lavender washi tape to the lower edge of the photo mat. I used the dots on the tape as a guide for stitching sequin hearts to the page. I included a spray of sequins that runs from the lower left corner to the upper right. 
This is my entry for the January Scrappy Friends Challenge
Here is the sketch from Rochelle Spears.
This challenge is combined with Stacy's Tic Tac Toe Challenge.
I used the far left vertical row.
Supplies:
Cardstock:Craftsmith
Paper:Bo Bunny
Alpha:Momenta
Veneer and Die:Peachy Cheap
Flowers:Recollections and Prima
Tickets and Gems:Prima
Sequins, Felt, Cork:Spiegel Mom Scraps
Circle Cutter and Heart Punch:Kreaxions

Scrap On!

~charity~

Saturday, January 4, 2020

Die-cut Flourishes and Sequins Layout

This layout of Pepe the parrot features die-cut flourishes and plenty of sequins. This pretty parrot caught our eye during a trip to the fair. he kept asking for potato chips and we got to feed him. I guess when one reaches the age of 70 chips are back on the menu!
~ Pepe ~
This is my take on this months Scraplift Challenge for Spiegel Mom Scraps sequins. I flipped the arrangement and used flourishes in place of the feathers. I embellished the flourishes with sequins from several different mixes.
The photos didn't do Pepe justice! There was so much going on in the background he hardly stood out. I fussy cut Pepe from one of the photos, gave him a curly cue perch, and framed him in white. Pepe is a blue and gold macaw but he looks orange in this lighting.
I doodled a frame and date/place stamp with Jelly Roll white ink. Tiny type and fabric letter bullet points give the pertinent details. Paprika by Photoplay was the perfect compliment to Pepe's personality and his love of BBQ Chips.
Supplies:
Paper:Photoplay
Cardstock:Crafter's Companion
Dies:Crafter's Companion and Echo Park
Tiny Type:Studio Calico
Alpha:Momenta
White Ink Pen:Jelly Roll
Sequins:Spiegel Mom Scraps

Scrap On
~charity~


Tuesday, December 24, 2019

How To Add Hand Stitching to Cards

These mixed media cards offer hand stitching details. They feature layers of specialty papers along with watercolor images, hemp cord, and sentiment in flowing script. Canvas Corp's "Nautical" and "Compose Your Life" collections are represented here.
Directions:
 Step 1: Stamp image on watercolor paper, heat emboss, paint with watercolors. 
Embossing the image gives your watercolors boundaries. The paint is more likely to stay exactly where you place it when  you use this technique.
 Step 2: Cut and adhere layers of cardstock.
The Mermaid is 4.5 x 3". The Anchor paper is 5.5 x 3.75". The Kraft paper is 8 x 6", folded. 
 Step 3: Position Cord around mermaid perimeter, stitch in place.
My final cord length is about 20".
I pierced holes at each corner of my image as well as on the sides. I started the thread at the back, ran it through the paper to the front, over the cord, and to the back through the same hole. I tied off each stitch before progressing to the next one.
 Step 4: Tie the cord into a loose square knot at the top of the card. Attach the top of the knot with adhesive or a couple more stitches to hold it in place.
 Mermaids are one of my favorite images. This imaginary creature of two worlds can be painted any color. Flowing hair, beautiful voice, and centuries of legends make her untouchably perfect. Yet, this lovely being conforms to each persons imagination just as they will it.
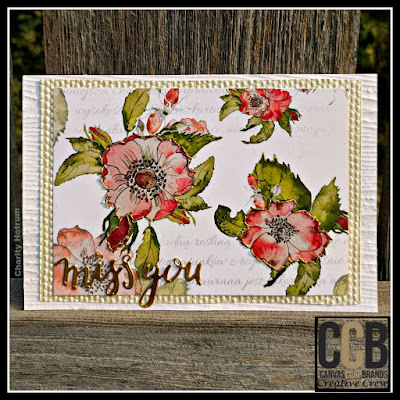
 This second card embraces the watercolor style with a little less work. Layers of hand made papers are topped with printed watercolor roses. Gold stitching outlines the flowers and gold foiled paper scripts the sentiment. 
Directions:
 Step 1: Cut papers. Adhere Roses to Ivory paper.
Roses Are Red paper is cut to 3 1/2 x 5".  Ivory Seed embossed paper is cut to 3 5/8 x 5 3/8". Wood Grain embossed paper is cut to 4 x 6". White Cardstock is cut to 8 x 6" and folded.
 Step 2: Outline roses with gold thread using a back stitch. 
Secure the ends with tape so the knot doesn't pull through. Stitching on paper must be done gently or the thread will cut the paper or leave rough edges.
 Step 3: Adhere Ivory paper to Woodgrain paper and Woodgrain to folded White cardstock.
Step 4: Cut sentiment from Gold Foiled paper with Die. Adhere to card front.
In my region wild roses bloom in extravagant patches by my birthday. They seem as happy to be alive as I am! A card bearing their lovely form is never out of style.
These cards were originally posted on the CCB blog in 2019.
Craft On!
~charity~

Thursday, December 12, 2019

How To Make a Layout with Hand Painted Pansies

This layout with hand painted pansies celebrates one of the many trips we took when my girls were little.While living in Europe we explored the beautiful country of Croatia. These photos were taken in the Roman arena in the coastal city of Pula. My oldest daughter wandered from tier to tier picking flowers (cvijeće) and making dandelion bouquets.
~ Cvijeće ~
Directions:
 Step 1: Place stencil in upper right corner and spread 3D Glossy Gel over it. Sprinkle with White embossing powder, heat to set. Repeat for lower left corner.
 Step 2: Fussy cut 8x8 Bohemian Romance: Live Freely paper into four sections. Draw a horizontal line 3.5" down from the top. Evenly space the fussy cut images across it, adhere.
 Step 3: Paint the 8x8 Bohemian Romance: BoHo Dreams paper with Glimmer Glam.
 Step 4: Fussy cut BoHo Dreams into flower sections and place over gaps on horizontal line. Reserve remaining flowers and leaves for later use.
 Step 5: Layer trim and lace over horizontal line, adhere.
 Step 6: Place photos then slip Architextures Findings: Garden Stakes behind them. Align Architextures Findings: Iron Fence with trim.
 Step 7: Die cut and assemble flowers from 8x8 Bohemian Romance pink, handmade paper.
I used two sizes of three-petal die. I painted the flower center and then the petal tips. I pinched each petal between my fingers and thumb to give them shape. I glued and stacked the flowers then added a dot of yellow Stickles in the middle.
 Step 8: Adhere Painted Pansies around the photos, adding leaves reserved from the BoHo Dreams page.
 Step 9: Place title over trim and iron fence.
Because my title is in Croatian, I added the same word under the main photo in English.

Craft On!

~charity~
Saturday, November 23, 2019

How To Make Tri-Sided Canvas Ornaments.

For something unique this year make a set of Tri-Sided Canvas Ornaments featuring vintage art and a steampunk flourish. If you are itching to add personal touches to your Christmas decor these beautiful ornaments will hit the spot! Glimmer Glam sets the tone while Parchment Rub-ons provide the illustrations. Architexture Findings and Industrial Gears add the final touches. With eight different mini shapes in canvas or burlap the options are plentiful.
7gypsies Rub-ons combine the look of vintage art with the ease of pre-inked rubber stamps in countless designs. Select an image, trim it out of the parchment paper, and rub onto your project. With the ability to meld with paper and fabric these Rub-ons offer upgraded vintage appeal! 
 Step 1: Paint Glimmer glam on one side of Canvas Mini Shape. 
I painted the edges heavily and brushed the center lightly. If you get too heavy a color on the canvas rinse it with water and retouch as necessary. Allow to dry thoroughly. A heated iron will heat up the process.
 Step 2: Add Parchment Rub-ons to the canvas shapes
It takes heavy rubbing to transfer the images onto canvas but the result is worth it. Alter images or layer several to customize your ornaments. For the round set I cut and turned the cats tail so it fit on the canvas. The Triangle ornaments have multiple gears overlapped.
 Step 3: Cut cord into 3 lengths. 11", 5", and 3" and attach to canvas shape. 
Tie Architextures Findings to one end of the cord lengths. Tie a large knot in the other end of the 5" and 3" lengths and 4" up from the Finding in the 11" length. The final goal is to have the findings hang in descending order. Stitch cord to lower end of canvas shape, just below the large knot. Thread a metal gear onto the top of the 11" cord and tie a sliding knot to keep it in place. I like to use a Poacher's Knot for this maneuver. It allows me to change the length of the cord.
 Step 4: Stitch the sides of the shapes together, leaving an opening at the top and bottom. In the above illustration Side B is stitched to side C, Side D is stitched to side E and Side F is stitched to side A.
 The final product will rotate on its axis, displaying each side as the ornaments are doing in the photo below. The lights on the tree will make the glitter in the paint sparkle as the ornaments turn.
 The Architextures Keys had holes ready pierced. I had to use a large needle to thread the Tiles and Coins onto the cord. I also placed corresponding keys, coins, or tiles back to back so that the turning ornament did not have an obvious "back side".
  At our house decorating for Christmas is a much anticipated event. My children sit around sipping eggnog from champagne flutes while taking turns dressing the tree. Ribbons, beads, and bulbs flow through their fingers as a dusting of glitter and tinsel drifts toward the floor. Many flavors of candy canes finish off the tree. The cats drape themselves around the room, basking in the glow of the lights and take great interest in the arranging of the Nativity Scene.
This project was originally posted on the CCB blog in December of 2018.

Craft On!

~charity~